My first attempt at building anything, pallets came from neighbours, and I bought some 2″ by 2″ for the frame and added in some chipboard shelves. Two pieces clamped together, and the bar top screwed down in three places.
I just bought this house and my wife, and I wanted to demolish this half wall cause it was an add on. After looking around on what to do with it, I told her lets pallet the wall, so I looked around for ideas. I got about 20 pallets and sanded them down and used a reciprocating saw to cut the boards off. Sanding them and cutting them took the longest. Then we bought some stain and stapled them to the wall so overall it took probably about five days of sanding all the pallets. Then staining and putting them on the wall took two days. It’s the cheapest project. I spent $30 for the stain $10 for the sanding pads and $12 for the staples.
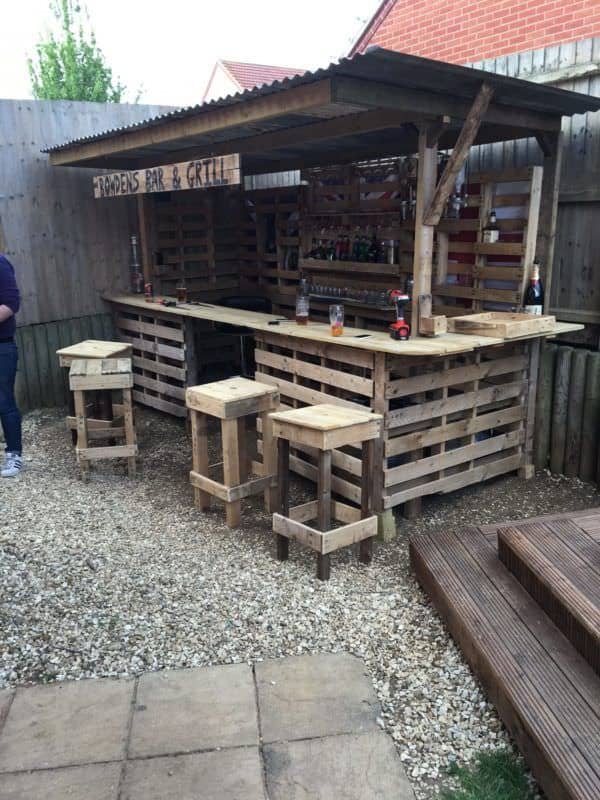
I was lucky with collecting pallets for my bar project. I emailed a local company to me as noticed they had a huge pile of pallets and asked if I could have some and luckily they said yes.
I probably collected about 140 pallets over the course of a couple of months. I decided to go big as have plenty of room in our garden. I made the base 7 meters long by 3 meters wide so I could use the whole pallets to fit up to the edge as they are a meter wide.
I cut small pieces of wood to screw each pallet together for stability and also used long screws to go through the wooden blocks on the pallets. Once the sides were complete, we used 4×2 pieces of wood for the roof beams, then used OSB board for the roofing plus four rolls of felt. That and the concrete base were the most expensive part. The windows were from a house that was being refurbished and was free. The doors were cheap from eBay.
We used the pallet slats to clad the outside over a waterproof membrane. I bought a cheap reciprocating saw to take the pallets apart, which was a bit time consuming but worth it. I also clad the inside with the slats but also used some plasterboard as to break it up a bit as didn’t want it to look like a sauna.
I made the bar inside from reclaimed glass bricks and pallet wood. The floor is also free wood which is another type of stackable pallet again from a local company. The floor and bar are varnished with a floor varnish called No Nonsense, and it is fantastic varnish and looks brilliant considering it was only £10 a tin! We loved building this. There are bits I would do differently if I did it again, but having said that the result is awesome, and those that have popped round for a beer have loved it too!
I simply made a platform the size of the bottom of the cooler and then built a box up from there. I removed the lid from the cooler and attached it directly to the lid of the chest. The bottom of the cooler is removable to dump water or clean. The hasp, latch, and handles are from the local hardware store with a little paint and modification. The lock is a “vintage pirate lock” on Amazon that comes with functioning keys. What makes it look great is the rugged details. The pirate emblem is a belt buckle I got from Amazon also. I burnt it unevenly some with a torch, lightly spray painted it, and then curved the edges of the mock braces with a wood file, then spray polyurethane it for a vintage shine and weatherproofed it. Tip: don’t try to use a large cooler, it gets heavy. Think mine is a 48 qt. Also, get a cooler with removable hinges.
My step-son and daughter-in-law wanted an Ultimate Garden Bar to complement their decking in their party garden. I decided that building them a bar would make an excellent wedding present. I priced pressure-treated, store-bought lumber, and it proved to be prohibitive – even for a small corner style unit!
Making the Ultimate Garden Bar Using Pallets – great party decor, outdoor gatherings, and lounge areas!
I received 20 pallets delivered to my driveway by going to the local builders merchants doing some cadging with them. I pressure-washed them (which took about 2 hours!), and I was ready to begin. As with all things, the design and size changed as ideas developed! I ended up building a full-scale beach-style tiki bar complete with galvanized steel roof for that authentic look. The roof was donated, so that kept the final cost to around £ 100! I hope you like it!
Now how about more seating as people wait to line up at the bar?
Even if you are used to working with pallets, I’m sure this contemporary house will not leave you indifferent. It is proof that pallet’s little vintage side fits perfectly in different styles. For this house, the approach has been to integrate a little touch of pallets in every room: the entrance with this message, the design of a full wall, the kitchen bar and some little pieces of furniture.
Cut and stained pallet wood various colors and cut to 3 inch heights of various lengths. Framed with pallet 2 x 4’s. Took about 8 hours to finish. Bar top is cherry wood from scrap.
I made this liquor station for my brother out of some old pallets I got from work. It took about 3 hours of sanding and prepping. Another 3 hours to assemble. Only about 1 hour to put a clear coat. It was a little tricky to get together and have everything level, so I lined it up before I drilled anything together. Dark walnut stain and my clear coat mix.
This Simply Stainless Pallet Bar uses 21 pallets, an upcycled aluminum pot, aluminum sheeting, and was designed using SketchUp Freeware.
Want your own Simply Stainless Pallet Bar? Here’s how:
What we used: EPAL-type pallets (we didn’t sand them – we varnished them in white). We upcycled an old aluminum pot as the sink. We made the counter tops out of 3mm bent-aluminum sheets. We assembled the shelves from 5mm plywood. We designed a simple faucet from galvanized pipe with a brass ball valve as the faucet head. We designed this using SketchUp – an amazing free software. We even used an old rake (also varnished white) as a wine glass rack. We’ve included a video from the SketchUp software to help you.
There’s nothing like enjoying a cold beer as you admire the Reclaimed Pallet Bar that you built yourself, and it didn’t cost a cent! Plus you can have a great place to display those homebrew trophies!
Information about my Reclaimed Pallet Bar:
I built this bar in about six hours. I constructed it entirely from various reclaimed timber that I found around my neighborhood. I sanded the counter and shelf tops smooth for ease of maintenance. I decided to leave the vertical slats in their more rustic state. I think this looks great, and really adds to our outdoor decor, and to the occasional party too. :-D
If you dream of being the go-to party spot for those special occasions, then dream big! Build yourself an Outrageous Pallet Bar like this one! Gather some pallets, spend a modest amount of money and then let your imagination run wild!
How I turned a dozen pallets into this Outrageous Pallet Bar:
I made this bar from reclaimed pallets, two sheets of exterior plywood, some 2×4″ boards, a lot of fasteners and even more imagination. I think the hardest part of the build was splitting the pallets apart. I did this to create shelves and to use boards to fill in gaps, so I tried to use complete pallets when possible. I used 12 pallets in this project, as well as some plywood. The fun part was adding all of the finishing touches to make it mine, such as lights, a “thatched” roof, and some stylized artwork. I built this in approximately 40 hours and spent around $500.00 on the project.
I used a total of 4 pallets to build the base and shelves of this Easy Pallet Bar. I saw a similar idea on Pinterest, and thought I’d give it a try!
Finish ideas for this Easy Pallet Bar:
I attached the bar top using fasteners and also supported the shelves with metal L-brackets. I used Min-wax stain and polyurethane combo to color and protected it. I added some LED lights to make the nighttime a bit more festive. I’m pleased with how this first project came out. Now that it’s complete, I need to test it out. :D
Why buy an overpriced, low-quality bar when you can build a Pallet and Scrapwood Bar that you can custom design to your home and your personal style?
How I built my Pallet and Scrapwood Bar:
I used all scrap wood (4×4, 2×2 and plywood) as well as pallets for this project. I aimed for an earthy, upcycled, beachy look. We installed locking casters/wheels so that we can move the bar wherever we need. We drilled holes in the upper sides and used pieces of nautical sisal rope instead of store-bought handles, securing them in place with simple knots. We feel it really softens the look and makes it much more organic feeling.
We recessed the sides to create shallow shelves to hold cups or any miscellaneous items. The inside of the bar is divided in half vertically, and then in half horizontally on one side. This created a set of shelves inside. We used pallets for the top and sanded them fairly smooth. We had a lot of fun painting them in a variety of colors, all in very natural tones with a gloss finish. We painted the body and insides of the bar a bright, clean white using Kilz 2 Latex for easy maintenance.
We built the project to be lightweight. We wanted it to be portable even when loaded with a lot of fun party supplies! Now we have a lot of storage space for a party or serving ware, bartending supplies, or anything else we want. We also have the flexibility of moving the party wherever we need to! And the best part is this only cost about 30 dollars!
We love the colors and the beachy feel, but you could have fun with a variety of finishes, colors and hardware to suit your home. This project used about 1 1/2 pallets, and took us about fifteen hours to complete, but it was well worth it.
We had a great bar that just didn’t look great. We decided to give it a facelift using Pallet Wood!
Bar Receives Pallet Wood Facelift:
First, we had to break down about 40 pallets. Next, we used 1″ x 2″ strips and attached them to the existing bar. We attached the pallet deck boards in a horizontal running pattern, staggering the colors for visual interest. When we completed the installation, we rough-sanded all the surfaces but kept some of the rustic texture of the pallet boards.
We completed this project in about 50 hours, but it was well worth it. We now have a beautiful Pallet Wood Bar that has a unique style and is a lot of fun.
Turn pallets into a conversation piece, like this LED-Lit Pallet Bar. It was made from 12 pallets and uses aluminum plates for decorative flair – as well as a light-reflecting surface.
Here’s how I made this LED-Lit Pallet Bar:
I started with two pallets that I put up on their ends and attached together. Then I cut more pallets up so that they had upper and lower deck boards with blocks sandwiched in between. I mounted three sets of these to the bottom of the two verticals to create a place for a lower, decorative shelf to be installed.
Next, I temporarily propped the two pallets up with a board until I installed more partial pallets for the sides. I added more sets of these along the tops and sides until the proper height was achieved.
Then I began cladding the sides using more deck boards. For a bit of flair, I added more boards on an angle to highlight the lower shelf. I used wide deck boards to create the countertop and lower counter space.
How I made my LED-Lit Pallet Bar a little different:
I installed aluminum plates behind the gaps in the vertical pallets for a different look. I plumbed for the LED lights but haven’t installed them yet as of this posting. The LED lights will reflect nicely off of the surface. I enclosed the back side of the bar and installed two low shelves for storage.
Finishing this LED-Lit Pallet Bar:
Careful sanding was key. I sanded everything down well, paying particular attention to the counter surfaces and very lightly rounded the edges for comfort. I left some of the natural characters of the pallets to remain; opting to leave nail holes and imperfections as-is.
Although I wanted a rustic feel, I wanted a little color. I stained the vertical surfaces and applied an oil for the counter tops. I added some jars on the lower counter top just to give this bar a different style. Plus, when the lights are installed, it’ll illuminate them nicely. I just couldn’t wait to share photos of this. I think this LED-Lit Pallet Bar came out quite well and looks good in place!
Ce bar à ete réalisé à la demande d’une restauratrice qui souhaitais intégré un bar en palettes de qualité et différent du simple assemblage de palettes.
Le bar à ete réalise en palettes pour la structure et en planches dsur coffrage pour le comptoir. Des plaques d’alu ont été utilisées sur la face avant du bar pour y intégrer un système de LED (pas encore installer). Des bocaux ont également été utilisés pour la d ci et ajouter un style différent à ce meuble.
These Wall Mounted Pallet Bottle-Top Catchers are easy projects! They’re made from scraps left over from other projects.
Pallet Bottle-Top Catchers:
Each one is a little different in size. I cut, glued and brad-nailed them together. They were painted, different images were transferred or stenciled on and Varathaned to protect them all. I used different styles of both new and used bottle-top openers for different looks. To make one yourself, find a piece of pallet wood (or other scrap wood) and cut it to the length you want. Plan for enough length to easily get the bottle underneath the opener. Next, use more scrap pieces to form a box and glue/nail/screw it together as you prefer. Add a bottom piece to complete the box and then either drill a mounting hole or install a hanger on the back. Finish to your liking and let the party begin!
Although I didn’t originally plan this One Pallet Bar to be so “redneck-esque,” the casual style has served many a house party with ease!
One Pallet Bar – an easy build!
This pallet bar is fairly easy to construct. Plans include a resin and bottle cap top to complete the look. I want to get heavy-duty casters and a retired service bar speed rail for extra storage too! But for now, this handy bar works fine in the man-cave! First, I turned a pallet onto its side and added boards to create shelves. I attached the other two pallets to either side of the center pallet at right angles. Next, I built little storage shelves on the inside. I filled in the gaps between the main deck boards with trimmed-down scrap boards. Finally, I added a countertop and lights.
Fun idea for a great little bar! Now, how about some wine storage?
Want to make some extra seating that’s fast, fun, and easy to make? Here’s how to build an Easy Pallet Stool in under 4 hours!
How To Build An Easy Pallet Stool:
First, dismantle some EPAL pallets (or larger pallets). Use deck boards that are approximately 4-5cm wide by 25mm thick. If you have larger boards, cut them down to the size you need. Next, cut four pallet stringers, or use 4×4″ posts and cut them to the height you want. Stain the boards any way you like, or paint them. Butt-join a seat frame with four boards, and install the legs into the inner corners using screws. Attach three or four boards across the top for the seat. Optionally, add more boards for a lower frame to support the legs further, and to provide a place for you to put your foot. Add any decorative touches you’d like and enjoy!
Questa sera un tutorial semplice di come costruire uno o piu’ sgabelli…. servono un pallet epal e un pallets ( foto 1 e 2) con dei listelli da 4/5 cm se sono piu’ grandi li taglieremo a misura. Fatti questi ( foto 3) prepariamo i pezzi per la seduta utilizzando i listelli del pallets Epal che sono spessi 25 mm. Montato tutto avremo il nostro bellissimo sgabello.
Thank you to FLAB pallets for this terrific tutorial! Here’s another idea to inspire you to create a work of art with pallets.
I made this Medium Outdoor Pallet Bar with three pallets, some corrugated scrap tin, and had a little fun with some rope lights to decorate. This is an easy bar to make in your spare time.
Add some fun to your backyard, outdoor area, or add to your party decor with this Medium Outdoor Pallet Bar!
I made the top and the base using a pallet for each. Then I framed the sides using the third pallet after I broke it down into pieces. I added some tin to the front and secured it from the inside. Next, I created the top by using some plywood I had left over. Then it was torch time to create the wood burned designs on the outside. I temporarily attached the metal stencils to the sides and carefully applied flame with a torch to Woodburn the designs in. Now it’s time to fill it up and have some friends over to “test drive” it. :)
How about adding a Grilling Shelf, so you’re ready for any reason to have a party?